
Klondike Derby Sled Plans
A new design for a strong, light, and inexpensive Klondike sled
This sled is:
- Collapsible, making storage and transport very easy.
- Very light weight, being made of relatively few thin boards.
- Strong. The flexibility of the lashings allows it to bend rather than break when it hits something or goes over an uneven part of the ground.
- Inexpensive: about $25 (plus skis).
- Something the Scouts can build. The Scouts can lash the sled together on their own.
Watch this video to see how the sled goes together. Special thanks for the video go to Troop 45, Warwick, New York, USA.
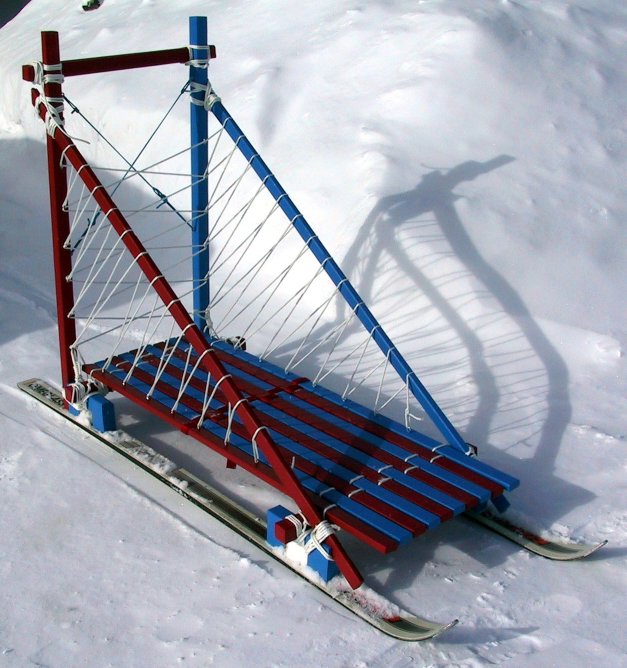
Before you read ahead, have a look at the Sled Diagram (PDF) and the detail pictures of the front and rear bindings.
The various parts of the sled are attached together by lashing with rope. There are 7 mm (¼″) deep notches where the pieces cross. This make aligning the pieces easy and keep things from slipping even if a lashing is not as tight as it should be. All the notches can be made with a circular saw or router. They don't have to be exact; the pieces should not fit tightly since they need to flex.
- Skis (pair)
- Used downhill skis are the best for a sled. These should be 185 cm (73″) or longer. Second-hand sports shops often sell these cheap. Note that there is no advantage to having new skis, though a freshly waxed surface does help.
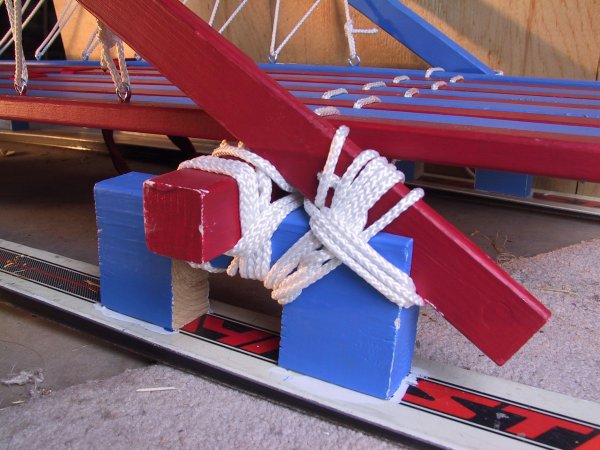
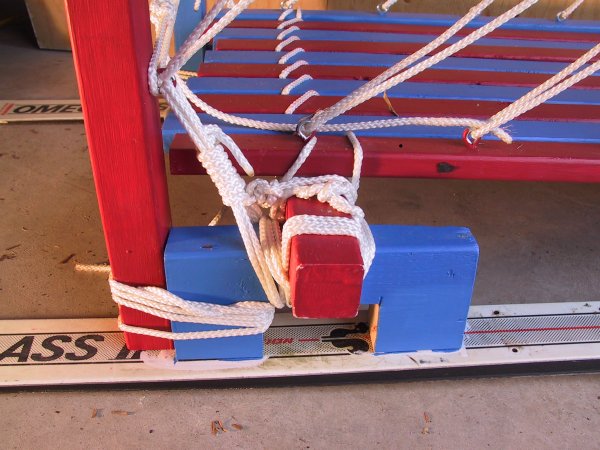
- Bindings (×4)
- These are 2×4 boards 20 cm (8″) long with 10×4 cm (4×2″) cut out of the bottom and 5 cm (2″) by 7 mm (¼″) cut out of the top. The front bindings have an angled, 2 cm (¾″)-wide slot cut in the front to accommodate the diagonal (see side view diagram).
Screw the skis to the bindings with 6 cm (2½″) or longer screws, one binding at the front and one at the rear. The screws come up, through the ski then into the binding. Use use screws with wide, flat heads to spread out the force, and counter-sink them so that they are flush with the bottom surface of the ski. Counter-sink them only just as far as you need to because the firm bottom surface of the ski is often thin. Smooth over the screw heads with a P-tex candle, a form of melted plastic used to repair skis which you can get at ski shops.
- Cross bar (×3)
- These are 2×2 boards, 60 cm (24″) long, with 5 cm (2″) wide notches 4 cm (2″) from the each end of the board. Two of these are lashed to the bindings and support the floor. The other is the push bar and is lashed to the uprights.
- Floor board (×10)
- A floor board is a 1×2 board 120 cm (4′) long. (1×2 boards are often sold in 8′ lengths; cut these in half.) The floor is made from ten such boards held together by weaving nylon webbing back and forth between them. There should be three such lashings. Each lashing will require about 2 m (6′) of webbing. Use a flat head screwdriver to help get these tight and even. Do this at home. The floor, which is flexible until lashed down to the cross bars, can be used to wrap the other pieces when packing the sled. The two outside floor boards should have eyes to hold the ropes for the sides. There should be eight eyes, 12 cm (5″) apart, starting 8 cm (3″) from the rear end of the board.
- Upright (left & right)
- The uprights are 2×2 boards, 1 m (40″) long. They rest on the skis and are lashed to the back of the rear bindings. The height is chosen so that it is a comfortable height for a Scout to push. On the inside, there are two eyes for the rear triangular brace ropes. These are 45 cm (18″) and 85 cm (33″) from the bottom of the upright. On the front, there are six eyes, spaced 10 cm (4″) apart, starting 20 cm (8″) from the bottom of the upright. These eyes are for the side and back mesh. The uprights come in left and right versions. The only difference is the location of the inside eyes and the notches for the diagonals.
- Diagonal (left & right)
- These are 1×2 boards, 150 cm (60″) in length. There is a 6 cm (2½″) wide notch 7 cm (2½″) from the bottom which fits into the slot on the front binding. It is lashed here with a shear lashing. There is a 5 cm (2″) wide angled notch 4 cm (2″) from the top on the side of the board. This fits the notch on the upright and is lashed with a square or diagonal lashing. Along the top edge, there are 5 mm (¼″) deep nicks to accommodate the ropes for the sides. These are 8 cm (3″) apart starting 20 cm (4″) from the top end.
Once the sled is assembled, two ropes which connect eyes on opposite uprights provide triangular bracing. Tighten these one at a time using a trucker’s hitch. To make the sides, rope is wrapped through eyes on the edge floor board and uprights, and in 5 mm (¼″) deep nicks in the diagonal. The back is done using the same eyes on the uprights (not shown).
Harness Design
A comfortable harness can be easily made by making a loop from 2 m (6′) of 2.5 cm (1″) nylon webbing. To this is tied a rope which leads back to the bindings on one side or the other of the sled. Ensure that an equal number of Scouts are pulling on either side. If you like, tie a short piece of bicycle inner tube from the webbing loop to partway down the rope. This allows some give in the harness which will keep the tension more constant. Ensure that if the harness is pulled hard, such as when climbing a sleep hill, the rope will become tight and do the pulling itself. Otherwise, something may give way unexpectedly and the sled may fly forward with all the energy stored in the over-stretched inner tube.
In addition to the pull harnesses, there must be a brake rope. This is a short rope tied between the two rear bindings. This is used by the musher to stop the sled. Note that the musher must not get into the rope as a sudden pull could pull the musher face-first into the push bar.