
How to Make a Scout Necker
And how to get the size right
Making a necker is not a difficult sewing job, but there are details that must be done correctly. These are the to most common mistakes:
- Sizing
- Neckers are often made too small and occasionally too big. See below for proper sizing.
- Cloth Orientation
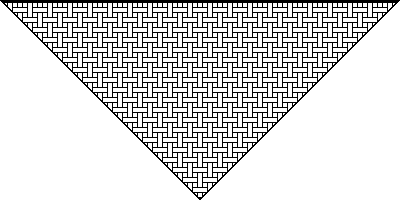
- If the cloth is not oriented correctly to
the necker, the necker will be very difficult to role and will not hang
properly. A necker has one long side and two short sides. The long side
must be parallel to the warp or weft of the cloth. The two short sides
must be parallel to the bias. This
image shows how the threads in the cloth must be oriented:
Most neckers are either a single solid colour, a solid colour with different-coloured trim, or half one colour and half another. Many also have a crest sewn to the point. These instructions are for making a necker with coloured trim. Leave out any steps that do not apply to the necker you are making.
- Cut a right-isosceles triangle of the main colour (the triangle has a 90° angle at the point and 45° angles at both tips). Follow the sizing below and make sure the two short sides are parallel to the bias.
- Finish the long edge of the necker (without any trim). It the necker does not have trim, finish all the sides. (If the long edge is the finished edge of the bolt of cloth, no edging is needed.)
- Cut 10 cm (4″) wide strips of the trim colour.
- Fold the trim strips in half, press, open out, and fold the raw edges towards centre fold (similar to bias tape). The finished stripes on the edges should be 2.5 cm (1″) wide.
- Attach the trim to the two short sides of the triangles and finish the ends by turning inside, making a point. At the point where the two short sides meet, the two pieces of trim should meet at a seam 45° from each side, so that it is symmetrical.
- If there is a crest, sew it to the right angled point so that it is about 1 cm (½″) from the trim.
Proper Sizing
Neckers tend to be made too small. Sometimes, they are made too big. Please follow these standard sizes. These sizes are for the finished necker. When cutting, cut enough extra to allow for whatever edging you will be doing.
The small size is for Beavers. The regular size fits most youth (except Beavers) and smaller adults. Larger Scouts and adults should wear the long size.
The height of the necker from the long side to the 90° point is always half the length of the long side.
| Necker Size | Length (long side) | Two short sides (used to estimate amount of trim needed) |
|---|---|---|
| Small | 93 cm (36¾″) | 66 cm (26″) |
| Regular | 106 cm (41¾″) | 75 cm (29½″) |
| Long | 125 cm (49¼″) | 88 cm (34¾″) |